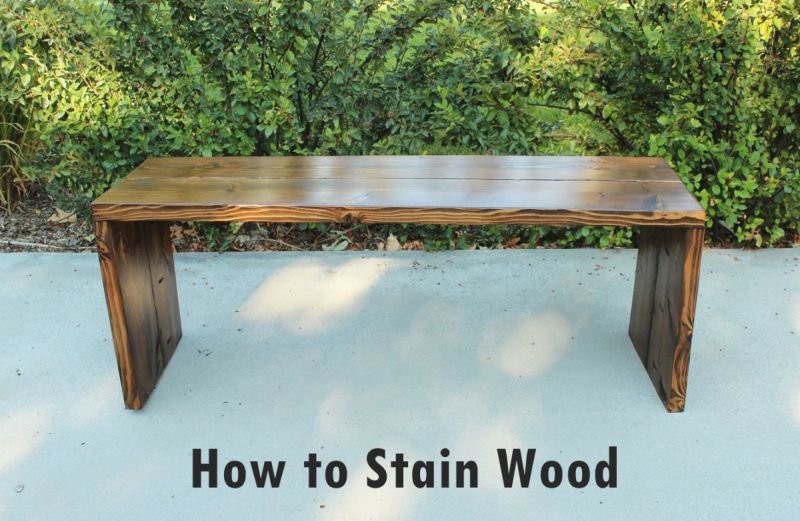
How to Stain Wood: A Basic Step By Step Process
Stain wood pieces can enhance a dwelling house's beauty and mode. The right stain on furniture makes a huge difference when decorating a living space.

If you've never stained woods before or worked with a wood cease, don't worry, we will show you. At the end, you will know how to turn your favorite bare wood article of furniture into small-scale treasures.
History Of Wood Stain
 View in gallery
 In 1750, wax was used to stain woods. The practice carried over into the side by side century when woodworkers began using beeswax. During the Victorian Historic period, a wood surface was finished with hardening oil, varnish, and wax.
Oil-based stain, like walnut and linseed oil, rosin, amber, copal, gum, turpentine, and inexpensive wine were mixed so that it made woods harder and longer-lasting. The oil base would create a flick over the surface to protect information technology from scratches, abrasions, and indoor moisture.
In the 1920s, stains were manufactured and became more than available to the public.
In What Is The Difference Betwixt Finish And Stain?
The departure between stain and finish is that the onetime adds color while woods finishes seal and protect wood from moisture. A stain isn't a finish because information technology requires varnish or you have to utilize a 2d coat of finish to protect the woods.
Also, finish is thicker than stain. Wood that has been stained and coated with polyurethane or lacquer volition give the surface a richer color and a moisture expect. Remember, stains provide color, and not a end.
Dissimilar Types Of Wood Grain Stain
Oil-Based Stains
Oil-based stain is the nearly popular worldwide for interior design projects. It is durable and tin intermission through tough woods layers. Linseed oil is natural and not-toxic and preserves a wood terminate or paint. Oil-based stains are versatile as they can be thinned with mineral spirits.
Water Based
H2o-based stain is thinner considering information technology uses h2o. It contains water-soluble aniline dyes that passes color. Water-soluble aniline dyes are chemically derived. The dyes are fabricated with powder from coal.
These types of stains have potent pigments that eternalize forest grains and leave surfaces with a smooth finish. One downside is they dry fast, which makes them difficult to work with for DIY newcomers. With water-based stains, the near important footstep is cleaning and drying the wood's surface.
Lacquer
As ironic every bit this may seem, lacquer stains don't have lacquer in them, they're but called lacquer stains. The stains dry fast and have an unmistakable odor due to the ketones and xylene in them. These types are thinner, which means they dry fast but require more than i coat.
Water-Soluble Dye
H2o-soluble stains come in powder form. When mixing them, add an ounce of pulverisation with one quart of water. For darker colors, increment the amount of powder in your mixture. They will fade after extended exposure to UV light, so it's best if you utilise them on indoor furniture.
Metallic Dye
Otherwise known as grain raising stains (NGRS), they are ready-to-utilise and dissolved in glycol ether blended with ethanol, retarder, or methanol. Different other stains, their color lasts longer and doesn't fade hands.
Varnish Wood
These types are hard drying so they go along their color much amend on wood surfaces. They are ideal for modest forest projects. Although they are strong, you will need to apply more than one coat.
Gel
Gels are the newest add-on to the stain family and were first made bachelor to the public in the belatedly 20th century. The stain is a high-viscosity liquid with thick, jelly pigments.
Tin can You Stain Green Treated Wood?
For outdoor wood projects, pressure-treated lumber is common. It is recommended to stain treated wood. Staining force per unit area-treated wood is practiced for outdoor wood piece of furniture and structures. When working with treated forest, you can reduce surface cracking.
Types of Treated Forest
- Wet-treated forest – this is the most common and will be wet when yous buy it. It may fifty-fifty "spit" at you when you nail it down. Let it dry before you stain it.
- H2o repellent treated wood – look for a tag that says "Thompsonized" or enquire the dealer if your lumber is this blazon.
- Kiln-dried pressure-treated lumber -stain the wood immediately with water based stains.
DIY Level: Beginner
 View in gallery
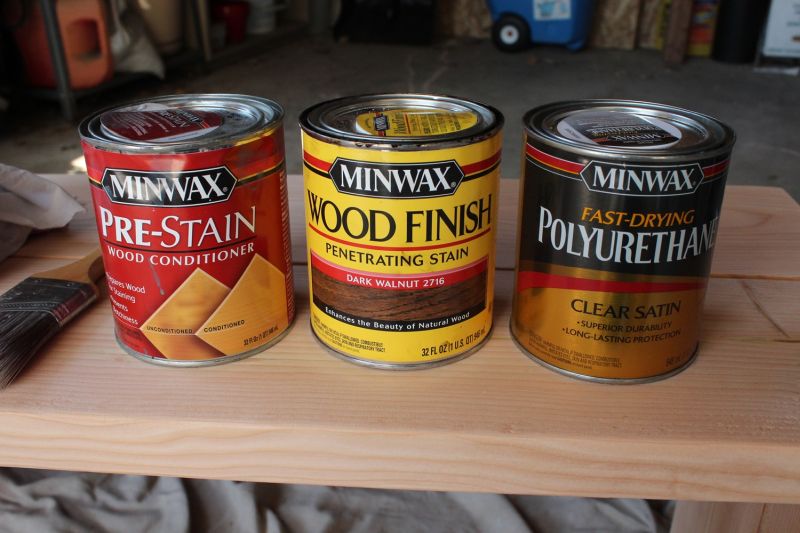
 Stain Woods Materials:
- Unfinished or scrap slice of forest, make clean and dry.
- Wood conditioner.
- Stain of your choice.
- Wood finishing coat, such every bit polyurethane.
- Bristle brush.
- Lint free rags.
- Driblet cloth.
Annotation: The pre-stain, stain, and topcoat must be compatible. If one is oil-based, the others must exist oil-based. A water-based stain doesn't work well on superlative of oil-based pre-stains, for example.
Stain Forest – A Stride Past Step Guide
Showtime with pre-stain, or pre stain wood conditioner
 View in gallery
 Begin with your pre-stain, or pre stain forest conditioner. Make sure the piece is clean and dry. When you prep wood, there should be no finishes on information technology or this will non piece of work. Utilize a stripping agent to remove previous finishes.
Pre Stain Wood Conditioner
 View in gallery
 Apply pre-stain wood conditioner with a clean bristle brush to a portion of your wood. If the pre-stain is arresting, move to the rest of your forest slice.
 View in gallery
 Cover the woods with pre-stain wood conditioner so information technology evens the wood and the stain will be absorbed.
Allow Pre Stain Wood Conditioner To Dry
 View in gallery
 Expect 5-15 minutes for the pre-stain wood conditioner to be captivated before yous start staining.
Clean Surface
 View in gallery
 Use a lint gratis cloth to clean the surface.
Top Coat
 View in gallery
 Yous have a small window to utilize the first coat for best results, about ii hours. Stir the stain (remember, employ oil-based if your pre-stain is oil-based), to avoid air bubbles. Stir during the entire procedure, depending on the size of the project.
Employ Stain
Utilize the stain to an inconspicuous spot with. a bristle brush, such every bit the underside of the bench.
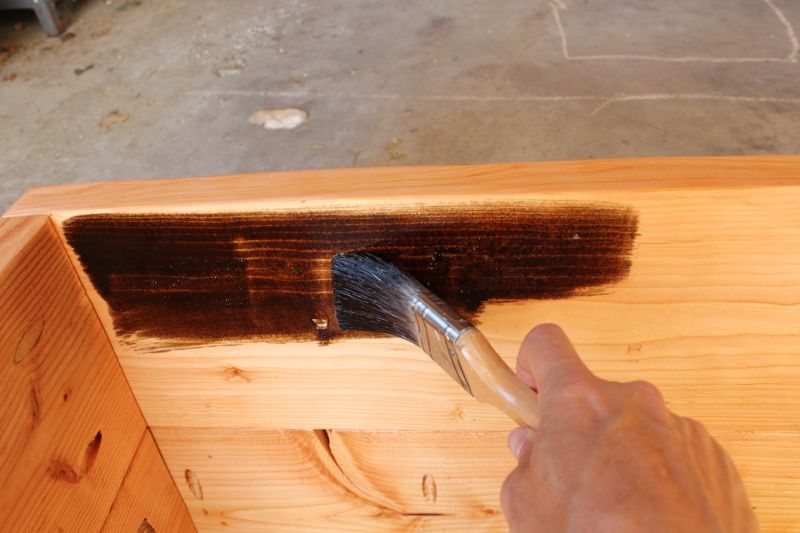 View in gallery
 Stain an inconspicuous spot on your piece, such as the underside of the bench.
 View in gallery
 Utilise the stain in the direction of the woods grain. Exist sure to castor abroad drips, every bit these may cause odd lines or unevenness in your finished stain. You lot can use a tack cloth to take hold of whatever waste.
 View in gallery
 Work in small sections, one area at a time, to create an even stain.
Allow Stain To Dry
 View in gallery
 Look 5-15 minutes for the stain to blot. (This example shows a vii-infinitesimal assimilation time of Dark Walnut stain.) The longer the stain has to absorb into the woods, the deeper the color, the darker the forest will be.
Wipe Make clean
 View in gallery
 Remove backlog stain with a clean textile. Don't let the excess sit on your unfinished wood. Information technology will expect blotchy and volition exist glutinous.
 View in gallery
 After staining the hidden areas, y'all're ready to stop your wood projection. Be sure to bank check the time and follow in the same fashion so your stain will blot evenly.
 View in gallery
 Later applying, waiting, and wiping the stain over your wood piece, have a break. Y'all'll need to await at to the lowest degree eight hours or more than, depending on the humidity and temperature. Allow the stain to absorb and dry out.
 View in gallery
 If for some reason you lot make up one's mind a few hours later on that you want your wood slice a flake darker, reapply a 2d coat of stain, following the same procedure. Allow it to dry after the 2nd glaze of stain has been wiped away.
Protective Glaze
 View in gallery
 After the stain has dried, and yous like the result, apply the protective coat. Remember, the top coat should be the aforementioned as your pre-stain and stain – oil-based to oil-based, h2o-based to h2o-based. This example uses a clear glaze polyurethane for the finishing coat.
 View in gallery
 Stir the polyurethane and mix the bottom of the can. Do not milk shake every bit this would cause air bubbling.
 View in gallery
 Use a natural bristle brush or foam castor to apply the polyurethane. When staining wood, you'll want to use information technology with the grain in an fifty-fifty just light coat. Permit the poly to dry for 3-4 hours or until it is dry and non tacky. Lightly sand with 220-grit sandpaper, wipe clean and utilize a 2d coat.
2nd Coat Of Stain
 View in gallery
 Repeat the sand-and-apply-poly process several times. This example shows two coats of polyurethane. Allow 48 hours for the polyurethane to dry out.
Final Upshot
 View in gallery
 Congratulations. Y'all've just completed your wood project.
Related: What Is The Best Fashion To Remove Stain From Woods?
 View in gallery
 It's amazing how stained forest can brand common wood await stunning.
How to Stain Wood Darker
Before yous tin can brand wood darker, make sure the existing stain is compatible with what is already on the wood.
Preparation
Remove excess parts from the wood that you desire to stain. For case, if you're working on a door, remove the doorknobs and handles.
Sanding Stain Wood
Use TSP soap or a degreasing sap to clean the wood surface before applying the new stain. Dust or grime will prevent it from sticking and could give the surface a bumpy look.
Sand the surface with medium grit sandpaper or 220 dust sandpaper for a textured feel. It will help the stain adhere to the surface.
Utilize Wood Stain
Employ wood stain to the surface with a tack cloth or constructed bristle castor. Employ it evenly and go with the management of the grain or in a circular motion. You could too try a lint free rag for smaller projects.
If staining over a polyurethane surface, employ a gel stain. Polyurethane is a sealer that makes surfaces non-absorbent. A gel will complement the surface.
Toner
If you want a darker color, toner will help. Toners can remove unwanted yellow and greenish spots. A toner will likewise add to the project's shelf-life as it provides extra surface protection. Let the toner to dry for 24 hours. Before you lot reassemble the wood project, wipe it with a damp cloth.
How To Stain Wood Frequently Asked Questions
Why Does Some Stain Forest Not Take Stain?
Forest takes stain differently based on its surface and if information technology'south already sealed. Stain cannot sit down on wood, but should soak and dry in wood pores. If the wood you're working with has been sealed past polyurethane or a cease, information technology volition be useless because it won't reach the woods pores.
Can You Employ Wood Conditioner Later on Staining?
Practise not put a wood conditioner over wood stain. You should employ wood conditioner beforehand. If y'all use a conditioner afterward, it volition remove the stain.
How Long Does Woods Stain Take To Dry?
On boilerplate, after applying stain, it will have between 24 and 48 hours to dry. Depending on your wood furniture, you might need to wait 72 hours earlier applying polyurethane to finish your project.
How To Become Woods Stain Off Skin?
You tin can remove woods stains with rubbing alcohol or isopropyl alcohol and acetone. Utilize a clean rag and solvents and rub the peel. Afterward, rinse your pare with lukewarm water and soap.
Can You Paint Over Stained Wood Without Priming?
If your paint adheres without bleed-through, y'all can paint over stained wood and you won't have to prime. If streaks appear, then yous will need to prime number with a bonding, stain-blocking primer.
How To Become Woods Stain Out Of Carpet?
To remove wood stain from your rug, you can use acetone and a lint complimentary rag every bit a DIY solution. Blot the stain and wipe. For bigger stains, WD-twoscore or lacquer thinner will assistance suspension downwardly the stain particles. If all else fails, enlist the services of a professional rug cleaner and steam clean the carpet stains.
How To Stain Forest Conclusion
Staining wood is a dandy way to tap into your DIY skills. The but daunting thing about staining is that it'due south permanent. And considering there are multiple products available, it's understandable if staining wood might exist difficult if information technology's your get-go fourth dimension.
You lot need to know what you're working with, from oil based and water-based stains to pre stain forest conditioner. Retrieve, wood stains provide colour, not a end.
Later on yous've used stain and you accept some leftover, do non throw information technology away. Stains are pricey, but they'll be fine sitting in a tin can for extended periods. If a pare glaze forms on the top, so throw it away.
Source: https://www.homedit.com/how-to-stain-wood/
0 Response to "How to Stain Wood: A Basic Step By Step Process"
Post a Comment